Recorder
The browser recorder lets you create voice notes, interviews, training videos, or screen recordings directly in StoryVault. You do not need to install additional software.
Before your first recording
Section titled “Before your first recording”- Use a current browser and a stable internet connection.
- Close other applications that use your microphone or camera.
- Use a headset where possible and make a short test recording.
- Only grant access to the microphone, camera, and screen sources you want to record.
Create a recording
Section titled “Create a recording”-
Open Recorder and prepare the session
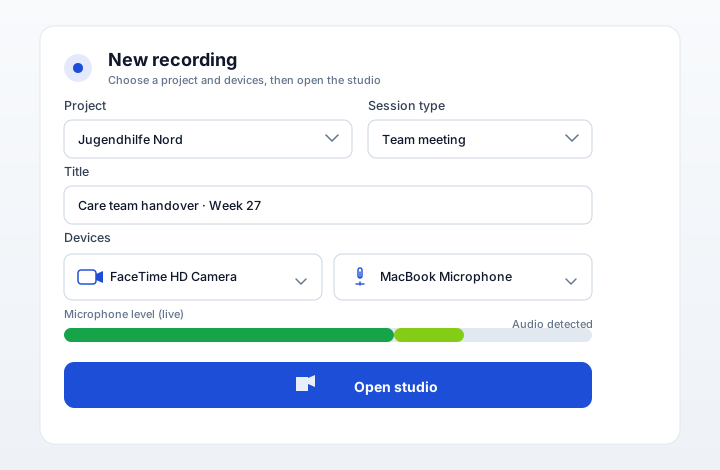
Open Recorder in the sidebar. Select a project and session type, then enter a descriptive title.
-
Check your devices
Select a microphone and, if needed, a camera. Say one sentence and confirm that the level meter moves. Grant the browser permissions when prompted.
-
Open the studio and choose sources
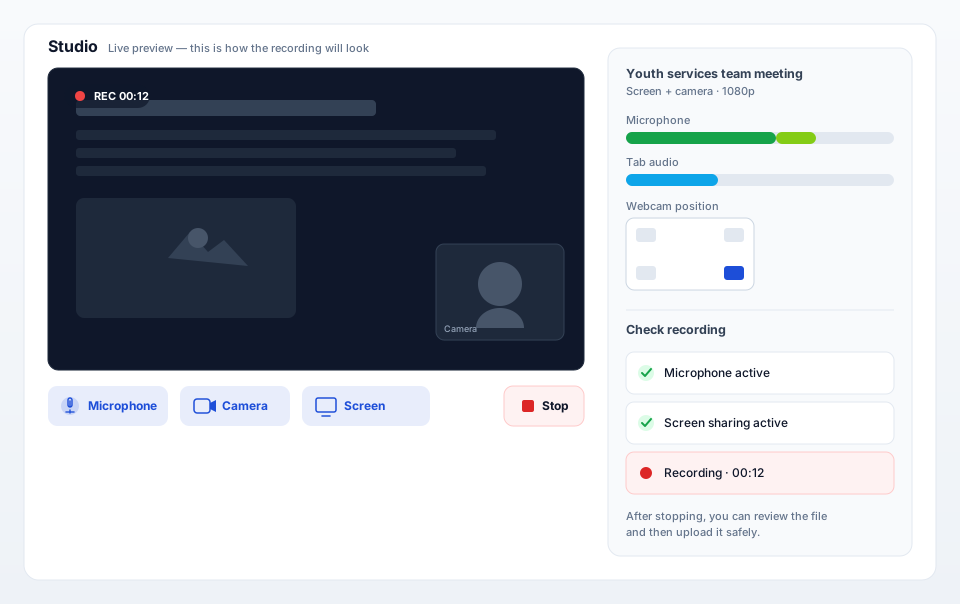
Open the studio and enable the combination you need:
- Audio only for voice notes and interviews
- Camera for a video message
- Screen for a demonstration
- Screen and camera for a presentation with a webcam overlay
When sharing your screen, select the required display, window, or browser tab. If you need audio from a browser tab, enable audio sharing in the browser dialog as well.
-
Start and monitor the recording
Press the red record button. The timer starts after a short countdown. Check that the microphone level and required sources remain active. For combined screen and camera recordings, you can change the webcam position while recording.
-
Stop and review the file
End the recording with Stop. Confirm that the file was created and that its displayed size is plausible.
-
Upload and open the session
Start the upload and keep the browser open until it has finished. Then open the session. StoryVault processes the recording and starts transcription automatically.
Recover an interrupted recording
Section titled “Recover an interrupted recording”Locally saved recordings appear under Pending recordings in the recorder lobby. Open the recording, review it, and upload it. Use the same account, tenant, browser, and device.
Do not clear website data before a successful upload. Use Discard only when you no longer need the recording. A warning about incomplete local storage means some parts may be missing. This recovery copy does not replace an additional backup of important recordings.
Prepare a process interview
Section titled “Prepare a process interview”In the process, select Interview guide → Open Recorder with saved guide. The studio shows questions from the selected process version. The new session is linked to that guide version. You can then link its transcript as a process source; this does not change the diagram automatically. More about guides.
Recording quality
Section titled “Recording quality”Depending on your device and shared source, the recorder captures up to Full HD (1080p). Clear audio matters more than high video resolution for reliable transcripts. Keep the microphone close, reduce room echo, and avoid speaking over other participants.
Phone and tablet
Section titled “Phone and tablet”On mobile devices, you can record your camera and microphone. Screen sharing is available in desktop browsers. For recurring recordings, add the web app to your home screen or use the native iPhone app.
Troubleshooting
Section titled “Troubleshooting”| Problem | Solution |
|---|---|
| No microphone activity | Check the selected device and allow microphone access in your browser and operating system. Close other recording applications. |
| Camera remains black | Select the correct camera, close video-conferencing applications, and reload the page. |
| Shared screen audio is missing | Share the relevant browser tab and enable its audio option. System audio is not available for every source. |
| Recording stutters | Close demanding tabs and share a smaller area. |
| Upload does not progress | Keep the window open, check your connection, and retry the upload if StoryVault offers that option. |
| Browser permission was denied | Open your browser’s site settings, allow the source, and reload StoryVault. |